How Bus Stop Design Shapes the Waiting Place
Bus stop design can clarify where to wait, what route to board, and how a shelter fits the sidewalk, helping passengers read the stop before the bus arrives.
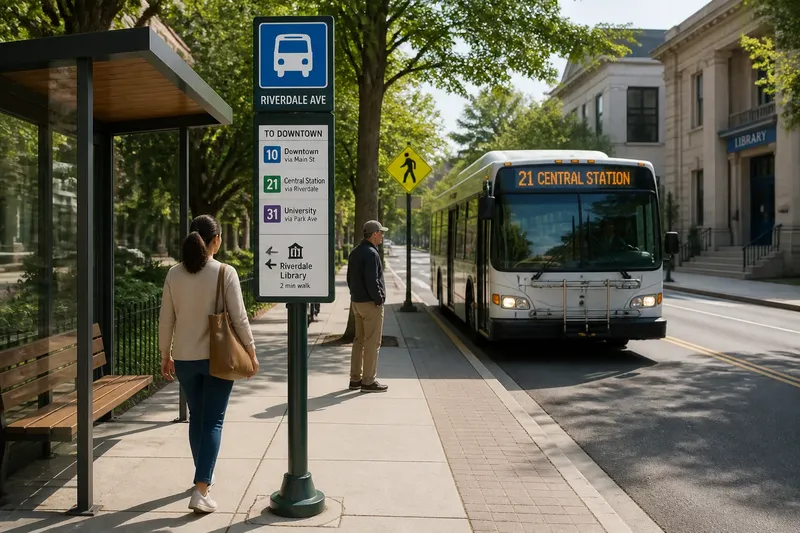
Where should you wait, and how can you tell which bus will stop there? Bus stop design answers those questions through visible cues: a marker, readable route information, a clear place to stand, and, where it fits, a shelter. Each element shapes how the stop meets the sidewalk.
Bus stop design starts
Imagine a neighborhood street where a bus pauses at a customary stretch of curb. Regular riders recognize the location, but someone new has little to guide them. There is no stop marker, route information, or obvious waiting area. The driver knows the usual stopping point; a passenger arriving on foot must guess.
The stop exists as a service pattern before it reads as a place. The bus slows, the door opens, and passengers gather near the curb. A sign can make that routine visible to newcomers, while a route panel can help them confirm the service. A shelter addresses a different need: a defined place to wait.
Start by identifying the uncertainty the design should resolve. If people cannot tell where the bus stops, consider a visible marker. If they find the stop but cannot identify the route or direction, review the information. If waiting space is exposed or crowded, consider how the curb and sidewalk can accommodate a waiting area.
Markers and information
A stop pole gives a location a visible address in the streetscape. Its position should make it recognizable from the sidewalk while leaving a continuous path for people walking past. Before choosing a spot, look for driveways, entrances, crossings, parked vehicles, and places where the sidewalk narrows.
A route panel should answer practical questions from the place where passengers naturally wait. Put the stop identity and route information where they can be read without stepping toward traffic. A map or destination list can help orient a passenger, but a crowded panel may be difficult to scan. Add information only when it helps someone make a decision.
Say an invented stop has a pole beside a driveway and its route panel faces away from people approaching on foot. The design team moves the pole to a clear section of sidewalk and turns the panel toward the approach. Passengers can then spot the marker before they reach it and read the route information from the waiting area; the tradeoff is that the new position still needs a site review to preserve access to the driveway and walking path.
Shelter fit and tradeoffs
What does a shelter add?
A shelter can define a waiting area and provide some cover from weather. Its roof, sides, seating, and lighting affect how people use the curb, so each feature should fit the location rather than be added by default.
Does every stop need a shelter?
No. A shelter may not fit where it obstructs the walking route, hides a sightline, or leaves too little room for boarding. A visible marker and a usable place to wait may be the better arrangement for that sidewalk.
Where should a shelter go?
Place it where waiting passengers remain visible to the bus operator and can board without forcing people walking past to weave around them. Check nearby entrances, crossings, curb space, and the path leading to the stop before settling on a location.
What should the route panel show?
Show the stop identity and the routes that serve it, with direction or destination details that passengers can read from the waiting area. If a panel is hard to scan or maintain, simplify it rather than filling every available surface.
Sidewalk design checks
Use these checks to decide which parts of a stop belong on a particular sidewalk. For each observation, choose the action that addresses the condition rather than adding features automatically.
- Check whether a passenger approaching on foot can see the stop marker. If a parked vehicle or street fixture hides it, then consider a more visible permitted location; otherwise, keep the marker where it is.
- Check whether the route name and direction are readable from the waiting area. If passengers must move toward the curb to read them, then reposition or simplify the panel; otherwise, avoid adding another sign.
- Check whether people can walk past the stop without squeezing around a pole, bench, or shelter edge. If the path is obstructed, then revise the layout or use a smaller fixture; otherwise, preserve the clear route.
- Check whether the bus operator can see waiting passengers and whether they can reach the boarding area. If a shelter wall or other object blocks either view or access, then change its placement or configuration; otherwise, retain the open sightline.
- Check for nearby driveways, building entrances, and crossing approaches. If a proposed fixture interferes with one, then move or omit it; otherwise, assess the remaining sidewalk space.
- Check whether passengers at the stop need to connect to a nearby route or destination. If there is a clear connection to explain, then add a concise direction to the existing panel; otherwise, leave out extra wayfinding.
Imagine an invented stop with a pole beside a narrow walking path, a route panel facing away from arrivals, and a library reached by a nearby marked crossing. The team first moves the pole to a clear sidewalk section, then turns the panel toward approaching passengers and adds a small library direction to that panel. If the new placement keeps the path open and the crossing cue is easy to see, the design supports finding, reading, and continuing the trip; if the pole still constricts the path, the team chooses a smaller marker or another location instead of adding a shelter.
Connections beyond the curb
A stop can point toward a nearby walking route, another bus service, or a local destination, but only when that connection is real and useful to passengers. A concise direction on an existing panel may be enough. If two services share a curb, distinguish their routes and boarding positions so passengers do not have to guess.
Do not turn every stop into a miniature transit hub. Extra diagrams and signs can compete with route information when there is no meaningful connection to explain. The useful design is the one that helps a passenger understand the next move without crowding the sidewalk.
Reading the finished stop
A pole marks a location; a route panel supports orientation; a shelter defines a place to wait. Their arrangement communicates what a passenger can do next. A striking structure is not useful if its sign is hidden or its footprint obstructs the walking path.
To assess bus stop design on a real street, approach from the direction passengers are likely to come. Notice when you first recognize the stop, where you can stand, what you can read, and how you reach the bus without crossing through the path of people walking by. If a route or location remains unclear, address that specific gap before adding another feature.
A decorative shelter is not worth the effort if no one has checked whether it hides the route panel or interrupts the sidewalk. A well-placed marker and readable information can make the waiting place easier to understand without adding a structure that does not fit.